To set up email forwarding, do the following:
  1. Click My domains in the navbar and then click the domain name.
  2. Click the Email tab .
  3. In the left field, enter the alias email name (for example, support) or a wildcard *.
    Note* is a wildcard that represents any address you have not explicitly named.
  4. In the right field, enter the recipient email address (for example, abc321@gmail.com). You can also enter the address of an email group (such as Google Groups) to forward this alias to more than one recipient.
    Tip: You can add multiple recipient addresses to a single alias by entering the address for a group you manage.
    Note: If you enter a group as the recipient address, make sure to set the permissions so that "public" or "everyone" can post emails to the group. Otherwise, the group will not be able to receive forwarded emails. See Set basic permissionsin the Google Groups help center.
  5. Click the Add button (result: all emails addressed to support@example.com will be forwarded to abc321@gmail.com).
  6. Google Domains will send a confirmation email to the recipient address. Follow the instructions in the email to activate forwarding to that address. Forwarding will not start until you have verified you own the address.
    Forwarding will start immediately and Google Domains will not send a verification email if:
    • You have already verified the same recipient address with Google Domains for another forwarded email alias.
    • The recipient address is the same address you use to log into Google Domains.
    Note: Email forwarding will only work when you're using the Google name servers.
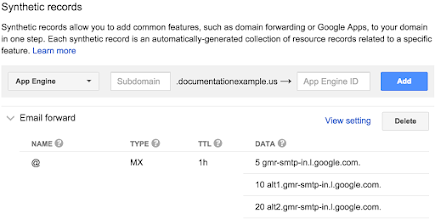
    When you set up email forwarding, Google Domains creates MX resource records. You can see these records by opening the Email forward synthetic record on the DNS tab .
         

    Test email forwarding

    After you have set up email forwarding and verified the recipient address, you can test the email forwarding by sending a message to the new email alias.
    Note: If you send the email from your existing recipient address, many email programs (such as Gmail) will automatically put the message into your Sent mail folder, and the message will not show in your Inbox. To see your email in your inbox, send it from a different address, or check your Sent mail.
    For example: If you forward the alias bob@example.com to myaddress@gmail.com, a message sent frommyaddress@gmail.com to bob@example.com may only appear in the Sent mail folder of myaddress@gmail.com. To see a message in your inbox, send the message from another address, or have a different user send the message from that user's email.


    To forward your domain, do the following:
    1. Click My domains in the navbar and then click the domain name (you are sent to the Website tab  by default).
    2. Scroll to the bottom of the screen.
    3. In the Web forwarding box, enter a URL or IP address in the field (see Domain forwarding values).
    4. Click the Save button.
    5. Check that your domain is forwarded to the intended location (see Verify domain forwarding).
    Note: When you set up domain forwarding, Google Domains creates the necessary resource records for you. If you subsequently change these resource records, domain forwarding will break.
    More help ...
    Examples of possible values for domain forwarding are shown here.
      root domains
    • example.com
    • https://example.com
    • http://example.com
    • subdomains
    • www.example.com
    • https://support.example.com
    • http://info.example.com
    • folders
    • www.example.com/marketing
    • https://www.example.com/products
    • http://www.example.com/services
    • IP addresses
    • 123.123.123.123 (IPv4)
    • 2002:db80:1:2:3:4:567:89ab (IPv6)
    Once you have set up domain forwarding, it's important to verify that your domain will be forwarded to the location you intended.
    To see how domain forwarding works, try this:
    1. Enter "www.google.com" in the Domain forward field (you can always change this later) and click the Savebutton.
    2. Click the DNS tab  and note the A, AAAA, and CNAME resource records that are created for you.
    3. Open a browser window and enter your domain name (for example, www.example.com) — you should be directed to the Google website.


    To direct your domain or a subdomain to an app hosted on Google App Engine:
    1. Make sure you know the App ID of your app.
    2. Click My domains in the navbar and then click the domain name.
    3. Click the DNS tab .
    4. Scroll down to Synthetic Records.
    5. Select App Engine from the list of synthetic record types.
    6. Add a synthetic record:
      TYPE   Subdomain  App Engine ID
      App Engine<the name of a subdomain or @ for the root domain><the ID of your App Engine app>
    7. Click Add and accept the changes to the resource record.
    TYPE   Subdomain  App Engine ID
    App Engineappexample01
    This example forwards app.documentationexample.com to the App Engine app with the id Example01.
    TYPE   Subdomain  App Engine ID
    App Engine@example01
    This example forwards the root domain (or "naked domain") documentationexample.com to the App Engine app with the id Example01.
    In a short time (a few seconds to a few minutes) your domain or subdomain will lead directly to the app.
    You can change or delete the record at any time by clicking Delete or Edit next to it in the list of synthetic records.
    Note: You can create up to 100 subdomains in Google Domains.
    For more help with Google App Engine, see: https://developers.google.com/appengine/
    Your web presence is what visitors will see when they enter your domain name in a browser.
    Google Domains offers you several choices for creating and managing your web presence:
    • Use one of the third-party website developers you can link to seamlessly from the Website tab of Google Domains, where you can create a new account or use one you already have set up.
    • Use another third-party website developer.
    • Use the web forwarding feature to redirect traffic to your domain directly to an existing site.
    • Use your domain name as a custom domain for Blogger or Google Sites.

    Use a third-party website developer on the Website tab

    The website developers whose logos you see on the Website tab have each offer different benefits and feature packages.
    To connect your domain with a third-party website developer:
    1. Choose one of four third-party webpage developers. The cards on the Website tab  include a gallery of themes and a summary of their plans and pricing.
      • Browse themes:
         
      • View plans and pricing:
         
    2. Click Start Trial to start a trial membership with the website developer and connect the membership to your domain name.

      Note: If you already have an account with the website developer, In the Blogger bar, click the down arrow next to the Start Trial button and select Connect existing account to log in to your account at their site, where you can add your new domain to your account.
      The website builder will open in a new browser tab.
    3. The website developer will ask permission to view information about your account, such as your email, your domain name, and your Google+ Identity. Click Accept to continue.
    4. After you click Accept, the website developer will create your account. This may take a few minutes.
    5. After creating your account, the website developer will ask for permission to manage resource records for your domain on Google Domains. Click Accept to continue.
      The website builder will create resource records for appropriate subdomains for your new site, such as:
      • @ (the root domain without a subdomain, for example “http://example.com”)
      • www
      • blog
      • shop (shopify only)
      Note: The website developer will manage these resource records in Google Domains. You will not be able to edit the records in the DNS tab . If you need to edit or delete these records, you must first unlink your domain from your account with the website developer.
      You can still add additional resource records.
    6. After you click Accept, and the website developer creates the resources you can start building your website.
      Each website developer has different features and techniques. See their help center for documentation on how to best build your website on their site:

    Returning to your website developer

    When you return to the Website tab  in Google Domains, at the top of the tab you will see a preview of what your site looks like and useful links for managing your site.
    • Click Edit site to return to your website developer to continue working on your site.
    • Click Change plan to select a different set of features and different payment plan with your website developer.
    • Click Cancel account to unlink your domain from your account with the website developer:
    • You will have two choices:
      • Click Cancel account to cancel or change your account with your website developer. You will be directed to their website to a page where you can choose other account options and cancel your account.
      • Click Unlink account to disconnect your domain from your website developer without changing your account. Your payment agreement with our provider will be unaffected, and you will be able to reconnect your domain.
      • Note: You will be able to edit the resource records created by the website developer if you unlink your account. Use caution when doing so if you plan to reconnect your domain to the website developer.
      Once you cancel or unlink your account, your domain will be unresolved. Users looking for your site will see either a 404 error or a “Host unresolved” error.

    Use another third-party website developer

    If you want to use another third-party website developer, you will need to set the resource records necessary to connect with their development and hosting tools. You can make these changes in the DNS tab .
    See your website developer’s help center for details on how to connect your domain to your account.
    See Resource records for help on adding and editing resource records.

    Use the web forwarding feature to redirect traffic to your domain directly to an existing site

    Web forwarding directs all traffic to your domain, either to the bare domain (“example.com”) or to www (“www.example.com”) to a website you specify.
    On the Website tab, below all of the cards for the third-party website developers is the Web forwarding box.
    Enter a URL or an IP address for the site you want to redirect to and click Save.
    After you enter a forwarding address, the top of the Website tab displays a preview of what traffic to your domain will see.
    Note: if you cancel forwarding, your website will be unresolved. Users looking for your domain will see either a 404 error or a “Host unresolved” error.

    Integrate your domain with other Google web tools

    You can use your domain as the custom domain for Google App Engine, Blogger, or Google Sites. In addition, you can integrate your domain with Google Apps to provide professional email and the entire suite of Google productivity tools.
    See the following Help center articles.
    1. Log in to Blogger as the administrator of your blog.
    2. In the overview page, click on Settings in the left column.
    3. In the Permissions area click on Add authors below the list of Blog Authors.
    4. Invite the owner of the domain (the ID you use to log into Google Domains) to be a contributor.
    5. Go to your email for the address you just invited. You should see an invitation to contribute to the blog.
    6. Open the email and follow the instructions to accept the invitation.
    7. Return to Blogger. Make sure you are logged in as the administrator of the blog.
    8. In the Permissions area in the list of blog authors, use the drop down menu next to the ID you just invited to make the ID an administrator. You may need to refresh your browser window to see the accepted invite.
    9. Log out and log back into Blogger with the ID you just invited.
         
    You can see more instructions for adding administrators to Blogger in the Blogger help center article About blog administrators
    Note: You must be the owner of the blog or a blog administrator with permission to manage its settings.
    1. Open the Website tab  for your domain.
    2. In the Blogger bar, click the down arrow next to the Create button and select Connect existing blog.
      The blog selection dialog box will display.
    3. Enter the subdomain you want to connect to the blog.
    4. Select a blog you own or manage from the list of blogs. If you do not see your blog, you may not be logged into Google Domains with the same ID you use to log in to Blogger. See the instructions to Add the domain owner as a Blogger administrator below.
    5. Check the box for Redirect documentationexample.net to <your selected blogif you want the root domain to direct to the blog as well as the subdomain you enter.
    6. Click Connect blog.
    1. Open the Website tab  for your domain.
    2. Below the Build button, select an option from the Blogger bar.

      • Click on Browse themes to view a gallery of themes or templates you can choose from to create your blog.
      • View plans and pricing: Blogger is always free of cost.
    3. Click Create to create your blog.

      • Title: Enter the name for your blog.
      • Address: Leave the address unchanged to link WWW to your blog or enter a different subdomain to use as the address for your blog, for example myblog.example.com .
      • Note: the address must include a subdomain and a domain name, in the format subdomain.domain.tld, for example: myblog.example.com.
      • Template: Select the template for your blog.
    4. Click Create blog! to create your new blog and start blogging.
      See the Blogger help center for more instructions on creating and updating your blog.